First, download Kaspersky TDSSKiller and save it onto your Desktop.
[*]Now double click the TDSSkiller.exe file to run it (if using Vista or Windows 7 do not double click on it but rather, right click and select Run As Administrartor. )
[*]If TDSSKiller does not run, try renaming it. To do this, right-click on TDSSKiller.exe, select Rename and give it a random name with the .com file extension (i.e. 123tdk.com).
[*]If you do not see the file extension, please refer to: How to view hidden, system files & folders!
[*]You may see a window similar to the below appear
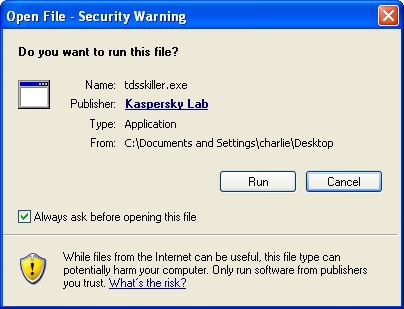
[*]Click on Run to allow the application to run properly.
[*]If you see any popup warnings from your antivirus or firewall about it trying to access the nework or similar, make sure that you allow it to run/have access.
[*]You will then see the below window
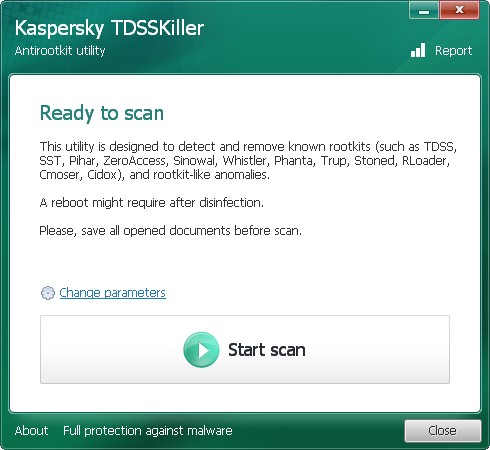
[*]When the program opens, click the Change parameters and you will see the below window
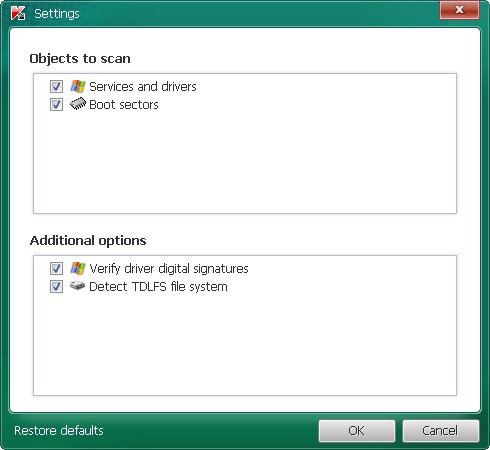
[*]Check the boxes beside Verify Driver Digital Signature and Detect TDLFS file system, then click OK.
[*]Click the Start Scan button.
[*]Click on the Start scan button to begin the scan and wait for it to finish.
[*][COLOR=red]Do not use the computer during the scan!
[*]Durring the scan it will look similar to the below:
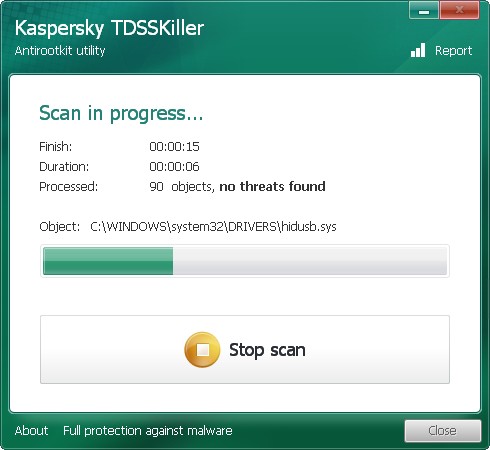
[*]When it finishes, you will either see a report that no threats were found like below:
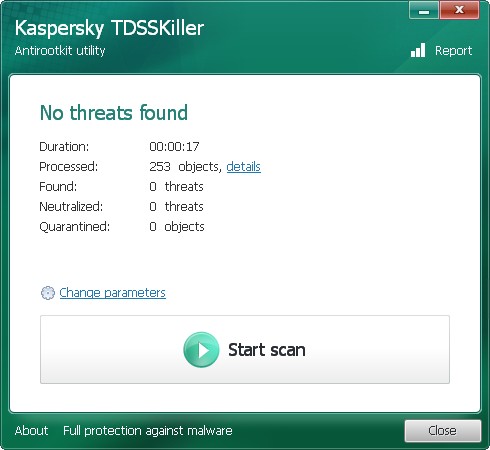
[*]If no threats are found at this point, just click the Report selection on the top right of the form to generate a log. A log file report will pop which you can just close since the report file is already saved.
[*]If any infection or suspected items are found, you will see a window similar to below.
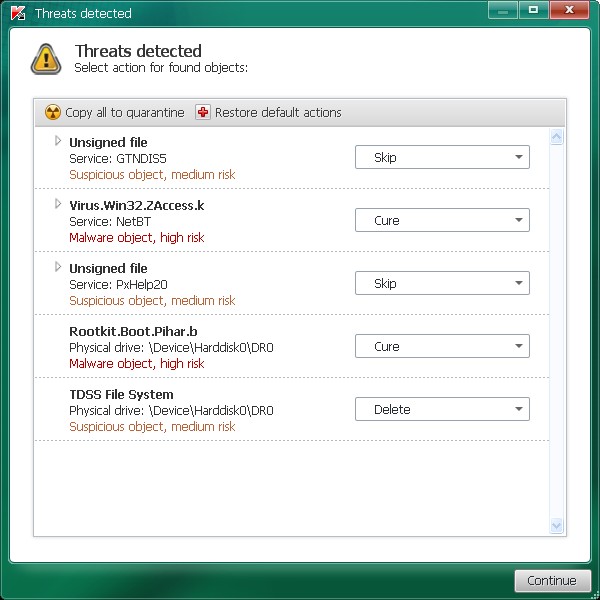
[*]If you have files that are shown to fail signature check do not take any action on these. Make sure you select Skip. We will tell you what to do with these later. These may not be issues at all.
[*]If 'Suspicious objects' are detected, the default action will be Skip. Leave the default set to Skip and click on Continue.
[*]If Malicious objects are detected, they will show in the Scan results. TDSSKiller automatically selects an action (Cure or Delete) for malicious objects
[*]Make sure that Cure is selected. Important! -> If Cure is not available, please choose Skip instead. Do not choose Delete unless instructed to do so.
[*]Just for Reference purposes, if you were to quarantine any detected objects, Quarantined files will not be removed! They are moved to a quarantine folder.
[*]The default quarantine folder is in the system disk root folder, e.g.:
[*]C:\TDSSKiller_Quarantine\23.07.2010_15.31.43
[*]After clicking Next, TDSSKiller applies selected actions and outputs the result.
[*]A reboot might require after disinfection. A window like below will appear
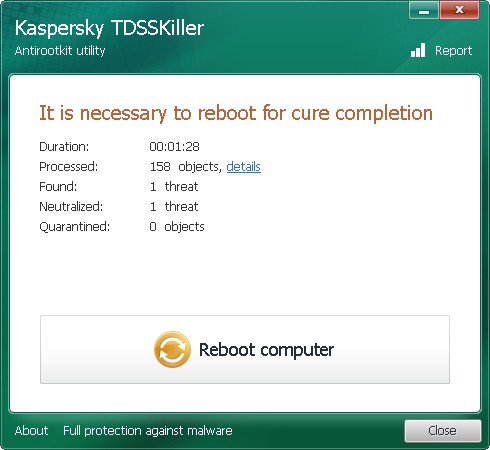
[*]Please reboot immediately if it states that one is needed.
[*]Whether an infection is found or not, a log file should already be created on your C: drive ( or whatever drive you boot from) in the root folder named something like TDSSKiller.2.1.1_27.12.2009_14.17.04_log.txt which is based on the program version # and date and time run.
[*]Please attach this log to your next reply. (See: HOW TO: Attach Items To Your Post )
[*]Now double click the TDSSkiller.exe file to run it (if using Vista or Windows 7 do not double click on it but rather, right click and select Run As Administrartor. )
[*]If TDSSKiller does not run, try renaming it. To do this, right-click on TDSSKiller.exe, select Rename and give it a random name with the .com file extension (i.e. 123tdk.com).
[*]If you do not see the file extension, please refer to: How to view hidden, system files & folders!
[*]You may see a window similar to the below appear

[*]Click on Run to allow the application to run properly.
[*]If you see any popup warnings from your antivirus or firewall about it trying to access the nework or similar, make sure that you allow it to run/have access.
[*]You will then see the below window

[*]When the program opens, click the Change parameters and you will see the below window

[*]Check the boxes beside Verify Driver Digital Signature and Detect TDLFS file system, then click OK.
[*]Click the Start Scan button.
[*]Click on the Start scan button to begin the scan and wait for it to finish.
[*][COLOR=red]Do not use the computer during the scan!
[*]Durring the scan it will look similar to the below:

[*]When it finishes, you will either see a report that no threats were found like below:

[*]If no threats are found at this point, just click the Report selection on the top right of the form to generate a log. A log file report will pop which you can just close since the report file is already saved.
[*]If any infection or suspected items are found, you will see a window similar to below.

[*]If you have files that are shown to fail signature check do not take any action on these. Make sure you select Skip. We will tell you what to do with these later. These may not be issues at all.
[*]If 'Suspicious objects' are detected, the default action will be Skip. Leave the default set to Skip and click on Continue.
[*]If Malicious objects are detected, they will show in the Scan results. TDSSKiller automatically selects an action (Cure or Delete) for malicious objects
[*]Make sure that Cure is selected. Important! -> If Cure is not available, please choose Skip instead. Do not choose Delete unless instructed to do so.
[*]Just for Reference purposes, if you were to quarantine any detected objects, Quarantined files will not be removed! They are moved to a quarantine folder.
[*]The default quarantine folder is in the system disk root folder, e.g.:
[*]C:\TDSSKiller_Quarantine\23.07.2010_15.31.43
[*]After clicking Next, TDSSKiller applies selected actions and outputs the result.
[*]A reboot might require after disinfection. A window like below will appear

[*]Please reboot immediately if it states that one is needed.
[*]Whether an infection is found or not, a log file should already be created on your C: drive ( or whatever drive you boot from) in the root folder named something like TDSSKiller.2.1.1_27.12.2009_14.17.04_log.txt which is based on the program version # and date and time run.
[*]Please attach this log to your next reply. (See: HOW TO: Attach Items To Your Post )

